Workshops, info sessions, Pro-D offerings I have presented as a teacher and library coordinator. (As of August 2016, I began working as a district administrator in Surrey - see my other blogs for more current presentations.)
Music Video with Animoto
On McRoberts Day, the Grade 12 students will be using Animoto to create a 30 second music video on the theme: "what high school means to me". (For full length videos with your own uploaded tunes, you have to pay. Otherwise: it's FREE!) They will be put in groups of 3, sharing a laptop for each threesome.
What we plan to have them do:
1. Brainstorm with your group using the outline sheet - see handout.
(You will each need to create an “Animoto” clip.)
2. Look for 10-12 pics (put them in folder on the desktop)
Google Images is a good place to start. (Animoto won't use more than 12 photos, but may only use as little as 6 or 7.)
3. Create an Animoto account: this requires an email address.
(This is fine as long as the students are over 13 years old!)
Go to http://animoto.com/
4. Upload pics, + add music (from the Animoto library), + text (if you like): = create!
The total number of pictures used for your creation depends on the the length and type of the music clip you select and the kinds of transitions Animoto ends up using. If you don't like it, you can remix again and again with different tune choices until you get what you want.
5. Let your partner create one, then your other partner.
5. Copy the “embed” code, then...
Send the code and a link to your teacher’s email.
The plan is to collect the embed codes, put them on a single webpage and let the Grade 8s vote on the top 10. We hope to show these to the incoming 7s at our orientation day.
(Some examples: in each case I uploaded pics labeled 1-12. You can see how many photos were used in each case.)
http://animoto.com/play/42A2zwrCDbhgPUO2ChHm5g?from=share
http://animoto.com/play/pkYzkDvrGff2dtFC5Vc5FA?from=share
http://animoto.com/play/wsGZvtn8RfPAiXDlr4weWg?from=share
See below for handouts:
Animoto Music Video
Choosing and Creating a Blog - MacNeill
Eve Minuk and I met to set up a class blog for 2 blocks of Hum 9 that she shares with Linda Watson. The first question was "which service will we use?" Eve had a list of "gotta haves" for this project:
- a clean, easy to navigate presentation,
- easy to set up easy to maintain
- no complicated password and ID management to get the students to participate
- a way to moderate posts/comments by the kids,
- a place to record homework
- a place for a class scribe
- an easy way to personalize the site
We ended up choosing Blogger because we could get most of what Eve was looking for, without a lot of set up and maintenance issues. Eve created a "Hum Along" blog to serve her 2 classes and a second "Homework" page that feeds info to the first.
She opted to set up the following features:
A header that identified the group, (which gave us an excuse to create a contest to replace it with something created by students!)
A "blog roll" section where she will post a question of the day. - She will be asking 5-6 students per class to comment on the reflection question. This keeps the posts to a manageable level, but gives everyone a chance to participate - eventually. (She has "comment moderation" enabled so student comments do not get posted until Eve has read them first. Using the "name/URL" option, she has students give their first name + initial. (One student was very shy - we gave her the ID "Agent 59".)
Eve added the polling widget so she could get some immediate feedback from students on a content related question: Was Napoleon a hero?
We also added a Youtube widget so she could post a current event of the week for classroom discussion.
The blog also pulls the homework posts from a sister blog we set up so students would not have to check a separate blog. (We used the gadget called: "Blogger posts and categories" The gadget description says "Just enter your a blog name to display posts and labels (categories), with navigation on label. A simple way to have a blog anywhere...." [This gadget stopped working recently, and was replaced with a Tabbed news feed ]
We added a "this day in history" gadget so students could have another topic for class discussion.
Here's where we are so far:
http://macneillhum.blogspot.com/
Blundell - Fairy Tale Podcasts
I met with Janice at Blundell Elementary to plan a Fairy Tale Unit with students that she works with in the library.
Her plan is to use GarageBand to create an audiobook of a Fairy Tale. (Recordings could also be posted as an enhanced podcast for downloading from home.)
Here are the steps we will use:
1. Review partner-work expectations. (How to listen, how to cooperate)
2. Choose and practice your story with a partner (read alternating pages)
(use: Folk and Fairy Tale Easy Readers - from Scholastic)
The Little Red Hen
Martina the Cockroach
The Three Little Pigs
The Spider and the Beehive
Stone Soup
Goldilocks and the Three Bears
The Three Billy Goats Gruff
The Gingerbread Man
The Tortoise and the Hare
The Ugly Duckling
The Princess and the Pea
The Elves and the Shoemaker
The City Mouse and the Country Mouse
The Nightingale
Cinderella
3. Students record their story on GB. Record each "page" as a separate audio clip. (Makes for easier editing.)
4. Read over the story and look for ways to "Sweeten" the audio:
(Music, sound effects, stingers, etc) Make a note where in the story each effect would go.
Check GB "menu" of Sound Effects choices to see what's possible. (See sample below)
5. Add the effects and music you have chosen. (Bring Earbuds from home for the lab work.)
6. Tweak your sounds for the best results.
7. The teacher will help students share: export to the desktop, burn as a CD or put on website (podcast) for parents.
(Extension: write your own fairy tales. Follow the same process above.)
(We'll post a sample once the students are finished.)
Sound Effects PDF
Natural Disaster Public Service Announcements
I went to Homma today to work with Shannon and her Grade 4 class. The students had just finished researching a natural disaster (hurricane, tornado, flood, earthquake). The goal was for each student to now produce a 30 second PSA that features their topic. Students were challenged to pick a focus (i.e. a warning, a report, an appeal for victims, a "what-to-do-if" announcement) and fold in some facts that they learned from their research.
We started by brainstorming what might be included in a typical PSA.
- Narrator
- Attention getting stinger
- Ambient sound effects (wind, rain, thunder)
- Music track for mood.
Then the students were given a quick overview of Garageband and some housekeeping details (i.e. how to create a folder on the desktop, create a New Podcast, save using student's name in the title, etc). I explained how the voice tracks and jingle tracks worked, showed how to record and how to add sound effects. Then (on the spot) I created a quickie demo for the students to model how a PSA might take shape.
We gave the students about 20 minutes in their groups of 3 to play with the settings, look for sound effects and get familiar with the interface.
After recess, I took the students in groups of ten to start working on their PSA. Step one was to record the narration. I encouraged the students to break the track into "bite-sized" pieces. (In this way, if there is a problem, the student can re-record just the problem section.)
By the end of the morning, every student had created a file, and started recording his/her narration. Some had even begun adding music and sound effects!
Because the keeners may finish far ahead of of the rest of the class, students who are done early will have the option of creating additional versions for their disaster. Two weeks from now, we plan to present each student's finished work to the entire class, and then upload the PSAs to a class website for parents to view.
===========
Here are the links to see some of their work:
PODCASTS
(This first link will allow students and parents to download the shows as podcasts to iTunes and load onto their iPods.)
VIEW on-line
(This link is so parents can view the finished projects on-line.)
One of the "tricks" to using Youtube to display student work is to create a tag and description that is made up of an invented word (i.e. "gradefourweatherprojecthometeachername" ). I've labeled all the videos with the same tag, then added them to a playlist with the same title as the invented word, and shared this a public playlist. The playlist will generate an embed code so you can put it on an external webpage: voilĂ .
=======
Some additional things to consider:
- Students will want to make sure their "end of recording" marker is snug up against the end of their podcast on the time line. A couple of students unknowingly had created a 20 minute production with 18 minutes of blank space at the end of their PSA!
- If students are adding art work or images to the top "podcast/image" track, make sure the pics are pushed up against each other, otherwise there will be black screen intervals throughout the podcast.
- Students can create an "album cover" that will show up when their work is downloaded as a podcast. If they want to see the cover when their PSA is played in class, leave a little blank space at the beginning of the "podcast/image" track.
Pro-D Day - Diefenbaker - Intro to Garageband
I was very happy to go to Diefenbaker Elementary (at the invitation of the Pro-D committee) to lead an afternoon workshop on some of the exciting ways Garage Band could be used in the Elementary classroom.
Garage Band is a great program that does for sound what iPhoto does for pictures. (In fact, I think iSound would have been a more apt and self-explanatory name!) All the labs in Richmond have this app installed as part of the default suite of offerings, so it makes sense to explore its potential.
Meaningful Integration
Any technology can be overused, or used in an unconnected fashion. In practice, we are looking for a logical tie-in with the content that is being covered in class. The trick is to always look at what your outcomes are: what do you want to students to know, to do and be able to demonstrate at the end of your unit?
GB can give a student a way to show his/her learning to the teacher, share it with the class or a wider "authentic" audience and provide extension or enrichment activities.
Where to start? Here's a copy of the handout I provided to get the conversation rolling: (click for larger image.)Literacy Extension Activities, Learning Demonstrations, Dramatic Extensions: each suggestion leads to other great ideas. Planning, teamwork, reflection, self-assessment, oral language production, story-boarding: students develop a range of skills as they complete the project. (In addition to recording their voices, students could even create ambient background soundscapes to play while they perform skits, read poetry or do creative writing. The only limit is our imagination.)
There are a great number of samples on-line for each of these activities. I've provided a few links here.
We then proceeded to look at how to build a simple podcast. (I created one earlier in the day using my voice and a couple of jingles. This allowed me to show how the elements work together. Click on the player below.)
I gave the teachers a chance to create a demo inserting their own voice along with some effects and jingles. Everyone had an opportunity to experiment and see just how easy GB is to use. (It got pretty noisy!) Hint: Teachers might want their students to bring their iPod earbuds with them to the lab. (If the school has headset/mic combinations, this would be even better.)
I've included some step-by-step instructions to work through the process here.
Garage Band 3 Steps
My impression was that teachers felt empowered to use GB with their class. Of course, it's only by playing with the app that we become confident users. Several teachers expressed interest in having me come back once they had played with the program a little more, and brainstorm with them about how they could introduce a GB activity to their students.
Visual Poetry (2) - Using Scrapblog
Joanne Panas' Grade 11 English class is also doing a "visualizing poetry" activity as part of her poetry unit.
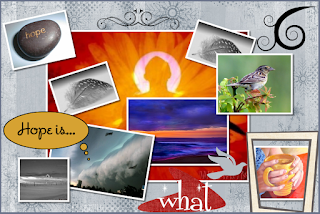
For this activity, Joanne is having the students use "Scrapblog" as a way of representing the images in the poem. Here's a "Quickie" example using the poem "Hope is the thing with feathers" as the inspiration.
When you go to the Scrapblog site, you will be offered a chance to "get started". Clicking this will open an editing window that runs on a Flash plugin. (Hint: You'll want to check that your lab or laptops have the latest version installed or the creator window might not load properly.)
Scrapblog.com offers the student many choices: a number of pre-set templates as well as the option of a starting with a blank screen. Adding "stickers" (embellishments), shapes, words and even pictures from the local computer (or a range of services: Facebook, Photobucket, Picassa etc) makes building an expressive scrapblog a snap!
For Joanne's class, we decided to have the kids create their collage and then take a screenshot so that their work could be displayed the next day. (With an email account, students over 13 can sign up for an account of their own and save their creations for subsequent editing.)
Here are the steps we used:
FYI: Here's a set of video tutorials on how to use the features of Scrapblog.
For this activity, Joanne is having the students use "Scrapblog" as a way of representing the images in the poem. Here's a "Quickie" example using the poem "Hope is the thing with feathers" as the inspiration.
When you go to the Scrapblog site, you will be offered a chance to "get started". Clicking this will open an editing window that runs on a Flash plugin. (Hint: You'll want to check that your lab or laptops have the latest version installed or the creator window might not load properly.)
Scrapblog.com offers the student many choices: a number of pre-set templates as well as the option of a starting with a blank screen. Adding "stickers" (embellishments), shapes, words and even pictures from the local computer (or a range of services: Facebook, Photobucket, Picassa etc) makes building an expressive scrapblog a snap!
For Joanne's class, we decided to have the kids create their collage and then take a screenshot so that their work could be displayed the next day. (With an email account, students over 13 can sign up for an account of their own and save their creations for subsequent editing.)
Here are the steps we used:
- Day 1: Students previewed their poem (1 of 3 used in the class) to look for words and images that spoke to them.
- Students were encouraged to look for images at home and bring them to school on a flash drive or via their personal email.
- Day 2: After a demo of scrapblog, students began assembling the elements and arranging them on the screen.
- Shift+Apple+4 activates a "crosshairs" cursor that students can click and drag over their collage to save a picture ("Picture 1", "Picture 2" etc) to the desktop. The pic is a PNG file that can be easily opened by Preview.
- Day 3: Using the "Slideshow" feature of Preview, students create a 'gallery walk' to show off their creations.
FYI: Here's a set of video tutorials on how to use the features of Scrapblog.
Visual Poetry - McRoberts Secondary
This week I'm working with Krista Ediger at McRoberts with her English classes. The goal is to get the students to create short iMovie clips that help show each student's "vision" of the poem the class is studying. Because every poem is a negotiation between the reader and the text, this will give the students a chance to see how the same work can be interpreted in many different ways.
Using visualization can be a powerful way to understand poetry. Here's an example from a site called poetryvisualized.com. (see below)
Here's how we introduced this to the students:
Two 74 minute periods were barely enough for a couple of the groups to finish. Plan on three classes. The time for this could also be shortened if students bring pics and audio clips from home on a flash drive. (They could even pre-record their poem at home if they have the software/hardware.
======================
Audio clips of poetry readings can be found here:
Using visualization can be a powerful way to understand poetry. Here's an example from a site called poetryvisualized.com. (see below)
Here's how we introduced this to the students:
- Step 1: Read through your poem and look for images
- Step 2: Practice your reading aloud of the poem a few times to get the rhythm and emphasis in the right places.
- Step 3: Open iMovie, create a new project (with your name in the file name.) Save this to the desktop so you can find it later. Record your poem on the audio track. Listen to it to see if it is clear and easy to understand. You might want to break the poem into stanzas and record each one separately. (That way, you won't have to re-record the entire poem if you are unhappy with one section.) Hint: If the volume is not high enough, you can change the microphone input level via the system preferences, using the sound panel.
- Step 4: Create a folder on your desktop called "Poem Pics". You can use Flickr or Google images to find jpegs that work for you. (Hint: Use names that are meaningful rather than the name from the original site. You should either use a name that corresponds to the image from the poem, or you could number the "ideas" in your poem and then save the images as "1a", "1b" etc, then it will be easier to put them in the right order.) While you are saving images, don't forget to paste the URLs into a Word or Text document for your credits page.
- Step 5: Begin adding the pictures you have collected. (Hint: Don't forget to disable the Ken Burns effect. Go to the Media browser, choose "Photo", select any picture, click on "show Photo settings" and de-select the Ken Burns option.) You can drag the entire "Poem Pics" folder into the right-hand "clips pane". (This means all the pictures will be available to you in the "Media/Photo" browser.)
- Step 6: Add pictures one by one to your sound track. You can double click on the image to lengthen or shorten the time it plays in your movie.
- Step 7: You can also add music or ambient noise from the "Media" browser by adding it to the second audio track.
- Step 8: Add transitions. (These will shorten the total time of each image.) Note: depending on the transition, and the total file size, this may be time-consuming.
- Step 9: Add titles and credits. Paste your URLs into the "Scrolling Block" Title and place at the end of your project.
- Step 10: How to show your work: You can play it "as is" in iMovie, or you can export it using "Share" for iPod, Web or email.
Two 74 minute periods were barely enough for a couple of the groups to finish. Plan on three classes. The time for this could also be shortened if students bring pics and audio clips from home on a flash drive. (They could even pre-record their poem at home if they have the software/hardware.
======================
Audio clips of poetry readings can be found here:
20 Poems for National Poetry Month
(Free Audio Downloads)
Podcasting at Diefenbaker Elementary
Kathy Pantaleo is doing an exciting project with the portable lab in her Grade 6/7 class. The students had already completed an endangered animals poster, and upon returning to class after the winter break have begun creating a Public Service Announcement-like podcast to feature their animal.
Students are using pictures of the artwork they created for their poster and images they've found on-line and are planning to use them as images in their Garageband creation.
We spent a good part of the day fine tuning the music and sound effects that students wanted to include, and then sent them off to record the script for their chosen animal.
Some things to consider:
- 30 or 60 second PSAs are a good length to work with.
- Preparing the script beforehand is a real time saver.
- Speak more slowly and carefully than usual when recording the commentary.
- Students can use a Flash drive if they plan to continue working at home.
- "Ducking" will help the vocal track stand out.
There is also this great podcast tutorial (Parts 1, 2 and 3) you can look at for more help.
(For some other interesting ways to use this technology, check out both this site and these examples.)
Problems viewing the final product?
Here are some tips.
===========================
Subscribe to:
Posts (Atom)